
In the last post in the series we’ve seen how to customize the likable Quick Edit box. Today, we are going to learn how you can do exactly the same, but this time for your own custom Taxonomies. In this post we’ll see how this can be done for any taxonomy screen in the WordPress dashboard.
Quickly Editing Fields
Similarly to how we handled Quick Edit under the Posts, the same principles apply here. First step is to register a new column, then add a custom field, then make sure the user’s input data goes into database storage properly, and last but not least — populate the field in the dashboard screen, so it can be edited.
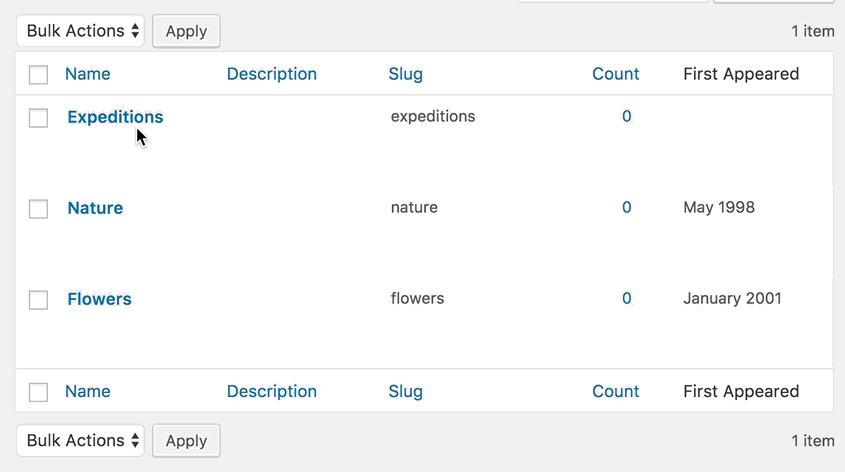
To make it easy to understand, let’s assume we have been tasked with creating a brand new “editions” section for an online magazine. Each “edition” needs to be able to display an important piece of information called “First Appeared” which stands for the date when the edition has been initially published.
For us to accomplish this, we’ll need to do a couple of things:
- Register a new taxonomy called “Edition”
- Register an admin column which will display the value in the WordPress dashboard
- Setup functions that will take care of retrieving, displaying and saving user input data
Let’s get going!
Step 1: Register a new Taxonomy
As I mentioned, first we’ll create a new taxonomy, called “Edition.” I’ve used our Taxonomy generator for this task.In this snippet, we’re using WordPress’ register_taxonomy function to register this new snippet.
Go ahead and copy & paste this code into your project.
Upgrade to GenerateWP Premium Enjoy better WordPress generators Upgrade Now
Step 2: Register a Custom Column for our custom Taxonomy screen
Now let’s register a new column that will show when viewing our new WordPress dashboard screen, “Editions”.
The manage_edit-{$taxonomy}_columns filter allows for adding/removing any columns that will show up for a given registered taxonomy. The filter’s callback receives an array which includes all registered columns, so all we have to do is append a new one and return the array back.
Great. Next step is to make sure that any user input that’s been saved, actually shows up under that column. Now we’ll take care of the function that displays whatever data is stored in the database for each of the terms we have (under the Edition taxonomy.)
The manage_{$taxonomy}_custom_column filter runs for each of the columns specified in the array previously, and exists to allow us to return whatever data we’d like to display under that column for a given term, one at a time. So this filter will run once for every column, and once again for every term in the table.
Eventually, this is the result we’re aiming for.

So far, in this step, we took care of 2 out of 4 of the essentials of having a functional Quick Edit field, which are: a) Registering a column, and b) Displaying its content. Just 2 more steps to go!
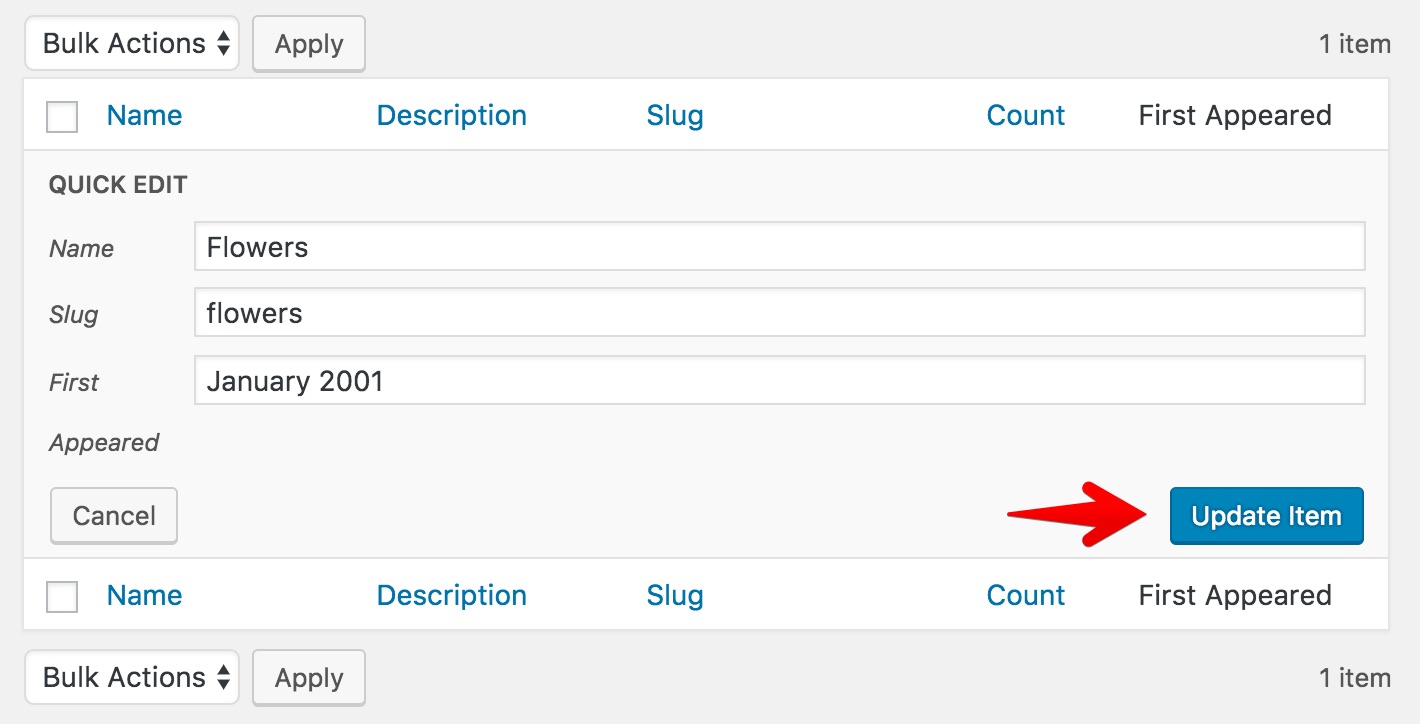
Step 3: Prepare field markup for Quick Edit box & store user-input data
So, how about the field itself? Well, we need to define it first. And when I say define I mean literally write up the entire HTML markup that it consists of. This will give us full control over the field, for maximum customization.
When examining this code you might notice that it doesn’t pull data from the database nor pull in any existing user data into the value="" attribute of the input field. Due to some limitations imposed by WordPress, this can’t be done in this way. Instead, the “WordPress way” here would be to insert any user data on-demand, using JavaScript.
Copy this code over to your project (same file)
Next up, we’ll need a function that will take any user-input data and will save it into the database upon “update” action (on the dashboard side.)
The edited_{$taxonomy} action triggers when a user interacts with the “Update” button in the WordPress UI. The callback grabs user data from the $_POSTed data and inserts it into the term meta using update_term_meta(...).
Step 4 (and last): Display logic for our new Taxonomy custom column
Last but not least, we got to make sure values from the database are correctly being pulled into our field when users click “Quick Edit”. Again, this is a limitation of WordPress — hopefully in the future there will be an easier way to go about this.
Examine this piece of code. It does the following:
- Ensures the code runs only on the correct dashboard screen (“Editions” Taxonomy screen.)
- Enqueues jQuery to allow us easier control over data copying with DOM manipulation
- Prints jQuery code that watches for user interaction with the “Quick Edit” link right by each item in the table. Once clicked, this code will copy previously stored text into the field dynamically.
Copy over this code and paste it right under all the code from previous steps.
In case you were wondering, we’re using the admin_print_footer_scripts-edit-tags.php action because it runs only on taxonomy pages within the dashboard, so that gives us a chance to drop the required JavaScript code to carry out this task.
So… you made it here! This is something worth celebrating (wink). All should work just fine for you now.
As a sidenote, customizing Quick Edit in WordPress is definitely something I think needs improvement. As long as Quick Edit sticks as part of WordPress core, the demand for easier development will only grow.
What do you guys think? Is Quick Edit an important aspect of your projects? Do you normally add custom Quick Edit fields for your clients? Please share in the comments.

2 Comments:
Joel Stransky
Great stuff @Maor. Adding columns has always been a weird chore. I really like how you used different yet applicable conditions to determine the correct page or iteration based on whats available within a given handlers scope.
Maor Chasen
Thanks Joel! Completely agree on that. I never got why there is a need to add a column first. Perhaps it will be worth creating a Trac ticket at some point. Currently I see nothing hinting at this issue there in the Trac.