
WordPress Shortcodes have become a standard in any premium theme or plugin, just as they should. They allow users to design and organize posts or pages, add functionality and insert elements without learning web development languages and programming techniques.
Even though they are easy to use, there are just a few things that are still difficult with shortcodes:
- Shortcode tags – When you have many shortcodes, it gets tough remembering the name of the shortcode tag you want to use.
- Shortcode attributes – Shortcodes can have many attributes and remembering the name or what each one does is impossible, and you are likely to get some wrong.
- Shortcode editing – When you have use many shortcodes in your content editor, the editing of the content gets messy and it’s hard to understand and follow the content flow.
So, in this tutorial we are going to solve all of these!
The Plan
We are going to create a simple plugin with a shortcode, then we are going to add a TinyMCE editor button to insert that shortcode trough a popup which will collect all of the user input for the shortcode attributes. Then, we are going to replace the shortcode in the TinyMCE editor with a placeholder image, much like the native gallery of WordPress (which is actually a shortcode, in case you didn’t know), and last – we are going to allow editing of the shortcode and its attributes by double clicking on the placeholder image. For demonstration sake, we are going to create a shortcode for a Twitter Bootstrap panel.
Bootstrap is the most popular HTML, CSS, and JS framework for developing responsive, mobile-first projects on the web. One of its many components is a panel, which is a style box block element and a perfect example to how shortcodes make your job easier. Instead of typing the needed markup each time in your editor you need to type the content of the panel in a shortcode that will output the markup for you.
Demonstration
Sorry for not having voice-over.
The whole plugin is available for download at GitHub
Coding the plugin
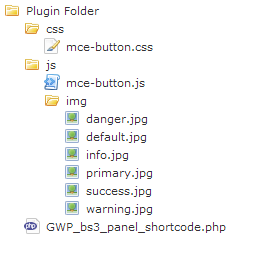
We start by creating a plugin directory and structure the files in sub directories that should look like this:
To start coding our plugin, we create a new file named GWP_bs3_panel_shortcode.php in the root directory of our plugin and we load it up with Standard WordPress Plugin Information header.
<?php
/*
Plugin Name: BS3 panel shortcode
Plugin URI:
Description: A plugin to add Bootstrap 3 panel shortcode as a part to the GWP tutorial
Version: 1.0
Author: Ohad Raz
Author URI: https://generatewp.com
*/
Then, we add the main plugin class with the methods we want to implement:
/**
* GWP_bs3_panel_shortcode
*/
class GWP_bs3_panel_shortcode{
	/**
	 * $shortcode_tag
	 * holds the name of the shortcode tag
	 * @var string
	 */
	public $shortcode_tag = 'bs3_panel';

	/**
	 * __construct
	 * class constructor will set the needed filter and action hooks
	 *
	 * @param array $args
	 */
	function __construct($args = array()){}

	/**
	 * shortcode_handler
	 * @param  array  $atts shortcode attributes
	 * @param  string $content shortcode content
	 * @return string
	 */
	function shortcode_handler($atts , $content = null){}

	/**
	 * admin_head
	 * calls your functions into the correct filters
	 * @return [type] [description]
	 */
	function admin_head() {}

	/**
	 * mce_external_plugins
	 * Adds our tinymce plugin
	 * @param  array $plugin_array
	 * @return array
	 */
	function mce_external_plugins( $plugin_array ) {}

	/**
	 * mce_buttons
	 * Adds our tinymce button
	 * @param  array $buttons
	 * @return array
	 */
	function mce_buttons( $buttons ) {}

	/**
	 * admin_enqueue_scripts
	 * Used to enqueue custom styles
	 * @return void
	 */
	function admin_enqueue_scripts(){}
}//end class
Next, we start with the easy part, which is adding the shortcode (implementing our shortcode_handler method) that will accept 3 attributes with content and return our panel markup. The attributes will be:
- Header – Used for panel header/title. If left blank, this part will be excluded from the markup.
- Footer – Used for panel footer. If left blank, this part will be excluded from the markup.
- Type – Used to easily create a panel more meaningful to a particular context by adding any of the contextual state.
Upgrade to GenerateWP Premium Enjoy better WordPress generators Upgrade Now
Once we have our plan, we can head up to our handy Shortcodes Generator to create a new shortcode with these attributes. A few click later, we get:
// Add Shortcode
function shortcode_handler( $atts , $content = null ) {

	// Attributes
	extract( shortcode_atts(
		array(
			'header' => 'no',
			'footer' => 'no',
			'type' => 'default',
		), $atts )
	);

	// Code
	//make sure the panel type is a valid styled type if not revert to default
	$panel_types = array('primary','success','info','warning','danger','default');
	$type = in_array($type, $panel_types)? $type: 'default';

	//start panel markup
	$output = '
<div class="panel panel-'.$type.'">';

	//check if panel has a header
	if ('no' != $header)
		$output .= '
<div class="panel-heading">'.$header.'</div>

';

	//add panel body content and allow shortcode in it
	$output .= '
<div class="panel-body">'.trim(do_shortcode( $content )).'</div>

';

	//check if panel has a footer
	if ('no' != $footer)
		$output .= '
<div class="panel-footer">'.$footer.'</div>

';

	//add closing div tag
	$output .= '</div>

';

	//return shortcode output
	return $output;
}
add_shortcode( 'bs3_panel', 'shortcode_handler' );
View snippet Clone snippet Download snippet
We are not going to go through this code because its not the point of this tutorial, yet the code is self explanatory and is documented with comments at almost every line.
Next, we are going to add our TinyMCE button by first checking if the user can edit with rich editing. Thus, we implement our admin_head method:
	/**
	 * admin_head
	 * calls your functions into the correct filters
	 * @return void
	 */
	function admin_head() {
		// check user permissions
		if ( !current_user_can( 'edit_posts' ) && !current_user_can( 'edit_pages' ) ) {
			return;
		}

		// check if WYSIWYG is enabled
		if ( 'true' == get_user_option( 'rich_editing' ) ) {
			add_filter( 'mce_external_plugins', array( $this ,'mce_external_plugins' ) );
			add_filter( 'mce_buttons', array($this, 'mce_buttons' ) );
		}
	}
We can now implement our mce_external_plugins and mce_buttons methods:
	 /**
	 * mce_external_plugins
	 * Adds our tinymce plugin
	 * @param  array $plugin_array
	 * @return array
	 */
	function mce_external_plugins( $plugin_array ) {
		$plugin_array[$this->shortcode_tag] = plugins_url( 'js/mce-button.js' , __FILE__ );
		return $plugin_array;
	}

	/**
	 * mce_buttons
	 * Adds our tinymce button
	 * @param  array $buttons
	 * @return array
	 */
	function mce_buttons( $buttons ) {
		array_push( $buttons, $this->shortcode_tag );
		return $buttons;
	}
Last, to finish up our class, we just need to implement admin_enqueue_scripts which we will use to include a CSS file with the button icon style (we are using DashIcons), so:
	 /**
	 * admin_enqueue_scripts
	 * Used to enqueue custom styles
	 * @return void
	 */
	function admin_enqueue_scripts(){
		 wp_enqueue_style('bs3_panel_shortcode', plugins_url( 'css/mce-button.css' , __FILE__ ) );
	}
The constructor should look like this:
	/**
	 * __construct
	 * class constructor will set the needed filter and action hooks
	 *
	 * @param array $args
	 */
	function __construct($args = array()){
		//add shortcode
		add_shortcode( $this->shortcode_tag, array( $this, 'shortcode_handler' ) );

		if ( is_admin() ){
			add_action('admin_head', array( $this, 'admin_head') );
			add_action( 'admin_enqueue_scripts', array($this , 'admin_enqueue_scripts' ) );
		}
	}
One last time, the complete plugin file should looks like this:
<?php /* Plugin Name: BS3 panel shortcode Plugin URI: Description: A plugin to add Bootstrap 3 panel shortcode as a part to the GWP tutorial Version: 1.0 Author: Ohad Raz Author URI: https://generatewp.com */ class GWP_bs3_panel_shortcode{ 	/** 	 * $shortcode_tag 	 * holds the name of the shortcode tag 	 * @var string 	 */ 	public $shortcode_tag = 'bs3_panel'; 	/** 	 * __construct 	 * class constructor will set the needed filter and action hooks 	 * 	 * @param array $args 	 */ 	function __construct($args = array()){ 		//add shortcode 		add_shortcode( $this->shortcode_tag, array( $this, 'shortcode_handler' ) );

		if ( is_admin() ){
			add_action('admin_head', array( $this, 'admin_head') );
			add_action( 'admin_enqueue_scripts', array($this , 'admin_enqueue_scripts' ) );
		}
	}

	/**
	 * shortcode_handler
	 * @param  array  $atts shortcode attributes
	 * @param  string $content shortcode content
	 * @return string
	 */
	function shortcode_handler($atts , $content = null){
		// Attributes
		extract( shortcode_atts(
			array(
				'header' => 'no',
				'footer' => 'no',
				'type' => 'default',
			), $atts )
		);

		//make sure the panel type is a valid styled type if not revert to default
		$panel_types = array('primary','success','info','warning','danger','default');
		$type = in_array($type, $panel_types)? $type: 'default';

		//start panel markup
		$output = '
<div class="panel panel-'.$type.'">';

		//check if panel has a header
		if ('no' != $header)
			$output .= '
<div class="panel-heading">'.$header.'</div>

';

		//add panel body content and allow shortcode in it
		$output .= '
<div class="panel-body">'.trim(do_shortcode( $content )).'</div>

';

		//check if panel has a footer
		if ('no' != $footer)
			$output .= '
<div class="panel-footer">'.$footer.'</div>

';

		//add closing div tag
		$output .= '</div>

';

		//return shortcode output
		return $output;
	}

	/**
	 * admin_head
	 * calls your functions into the correct filters
	 * @return void
	 */
	function admin_head() {
		// check user permissions
		if ( !current_user_can( 'edit_posts' ) && !current_user_can( 'edit_pages' ) ) {
			return;
		}

		// check if WYSIWYG is enabled
		if ( 'true' == get_user_option( 'rich_editing' ) ) {
			add_filter( 'mce_external_plugins', array( $this ,'mce_external_plugins' ) );
			add_filter( 'mce_buttons', array($this, 'mce_buttons' ) );
		}
	}

	/**
	 * mce_external_plugins
	 * Adds our tinymce plugin
	 * @param  array $plugin_array
	 * @return array
	 */
	function mce_external_plugins( $plugin_array ) {
		$plugin_array[$this->shortcode_tag] = plugins_url( 'js/mce-button.js' , __FILE__ );
		return $plugin_array;
	}

	/**
	 * mce_buttons
	 * Adds our tinymce button
	 * @param  array $buttons
	 * @return array
	 */
	function mce_buttons( $buttons ) {
		array_push( $buttons, $this->shortcode_tag );
		return $buttons;
	}

	/**
	 * admin_enqueue_scripts
	 * Used to enqueue custom styles
	 * @return void
	 */
	function admin_enqueue_scripts(){
		 wp_enqueue_style('bs3_panel_shortcode', plugins_url( 'css/mce-button.css' , __FILE__ ) );
	}
}//end class

new GWP_bs3_panel_shortcode();
Moving on. We create our mce-button.css file inside the css directory, which will show the button icon.
i.mce-i-bs3_panel:before {
    font-family: "dashicons";
    content: "\f116";
}
Now we get to the action – we are creating the TinyMCE plugin! Create the mce-button.js file inside the js directory, and start with a standard TinyMCE plugin wrapper.
(function() {
	tinymce.PluginManager.add('bs3_panel', function( editor, url ) {
		var sh_tag = 'bs3_panel';
	});
})();
Following that, we add our popup as a TinyMCE command and the button that will execute that command:
//add popup
editor.addCommand('bs3_panel_popup', function(ui, v) {
//setup defaults
var header = '';
if (v.header)
header = v.header;
var footer = '';
if (v.footer)
footer = v.footer;
var type = 'default';
if (v.type)
type = v.type;
var content = '';
if (v.content)
content = v.content;
//open the popup
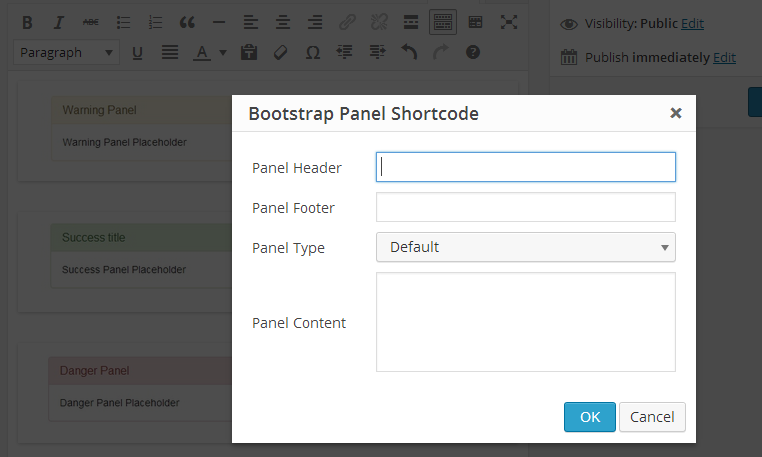
editor.windowManager.open( {
title: 'Bootstrap Panel Shortcode',
body: [
{//add header input
type: 'textbox',
name: 'header',
label: 'Panel Header',
value: header,
tooltip: 'Leave blank for none'
},
{//add footer input
type: 'textbox',
name: 'footer',
label: 'Panel Footer',
value: footer,
tooltip: 'Leave blank for none'
},
{//add type select
type: 'listbox',
name: 'type',
label: 'Panel Type',
value: type,
'values': [
{text: 'Default', value: 'default'},
{text: 'Info', value: 'info'},
{text: 'Primary', value: 'primary'},
{text: 'Success', value: 'success'},
{text: 'Warning', value: 'warning'},
{text: 'Danger', value: 'danger'}
],
tooltip: 'Select the type of panel you want'
},
{//add content textarea
type: 'textbox',
name: 'content',
label: 'Panel Content',
value: content,
multiline: true,
minWidth: 300,
minHeight: 100
}
],
onsubmit: function( e ) { //when the ok button is clicked
//start the shortcode tag
var shortcode_str = '[' + sh_tag + ' type="'+e.data.type+'"';
//check for header
if (typeof e.data.header != 'undefined' && e.data.header.length)
shortcode_str += ' header="' + e.data.header + '"';
//check for footer
if (typeof e.data.footer != 'undefined' && e.data.footer.length)
shortcode_str += ' footer="' + e.data.footer + '"';
//add panel content
shortcode_str += ']' + e.data.content + '[/' + sh_tag + ']';
//insert shortcode to TinyMCE
editor.insertContent( shortcode_str);
}
});
});
//add button
editor.addButton('bs3_panel', {
icon: 'bs3_panel',
tooltip: 'BootStrap Panel',
onclick: function() {
editor.execCommand('bs3_panel_popup','',{
header : '',
footer : '',
type : 'default',
content: ''
});
}
});
This alone will make our button functional and will insert the shortcode. Still, we want too see a placeholder instead of the shortcode, so we are going to use two TinyMCE events: the first is BeforeSetcontent, which is triggered when you set the content or go from the HTML editor to the visual editor. The second is GetContent, which is triggered when you go from the visual editor to the HTML editor. So we add:
Upgrade to GenerateWP Premium Enjoy better WordPress generators Upgrade Now
		//replace from shortcode to an placeholder image
		editor.on('BeforeSetcontent', function(event){
			event.content = replaceShortcodes( event.content );
		});

		//replace from placeholder image to shortcode
		editor.on('GetContent', function(event){
			event.content = restoreShortcodes(event.content);
		});
Now, let’s define the replaceShortcodes and restoreShortcodes functions with a few little helpers functions:
		//helper functions
		function getAttr(s, n) {
			n = new RegExp(n + '=\"([^\"]+)\"', 'g').exec(s);
			return n ?  window.decodeURIComponent(n[1]) : '';
		};

		function html( cls, data ,con) {
			var placeholder = url + '/img/' + getAttr(data,'type') + '.jpg';
			data = window.encodeURIComponent( data );
			content = window.encodeURIComponent( con );

			return '<img src="' + placeholder + '" class="mceItem ' + cls + '" ' + 'data-sh-attr="' + data + '" data-sh-content="'+ con+'" data-mce-resize="false" data-mce-placeholder="1" />';
		}

		function replaceShortcodes( content ) {
			//match [bs3_panel(attr)](con)[/bs3_panel]
			return content.replace( /\[bs3_panel([^\]]*)\]([^\]]*)\[\/bs3_panel\]/g, function( all,attr,con) {
				return html( 'wp-bs3_panel', attr , con);
			});
		}

		function restoreShortcodes( content ) {
			//match any image tag with our class and replace it with the shortcode's content and attributes
			return content.replace( /(?:<p(?: [^>]+)?>)*(<img [^>]+>)(?:<\/p>)*/g, function( match, image ) {
				var data = getAttr( image, 'data-sh-attr' );
				var con = getAttr( image, 'data-sh-content' );

				if ( data ) {
					return '

[' + sh_tag + data + ']' + con + '[/'+sh_tag+']

';
				}
				return match;
			});
		}
Then, we need to tell our TinyMCE plugin to listen to a double click event on our placeholder image and call the popup with the current values, so we could edit the shortcode:
		//open popup on placeholder double click
		editor.on('DblClick',function(e) {
			var cls  = e.target.className.indexOf('wp-bs3_panel');
			if ( e.target.nodeName == 'IMG' && e.target.className.indexOf('wp-bs3_panel') > -1 ) {
				var title = e.target.attributes['data-sh-attr'].value;
				title = window.decodeURIComponent(title);
				console.log(title);
				var content = e.target.attributes['data-sh-content'].value;
				editor.execCommand('bs3_panel_popup','',{
					header : getAttr(title,'header'),
					footer : getAttr(title,'footer'),
					type   : getAttr(title,'type'),
					content: content
				});
			}
		});
…and once again, the complete mce-buttons.js file contents should look something like this:
(function() {
	tinymce.PluginManager.add('bs3_panel', function( editor, url ) {
		var sh_tag = 'bs3_panel';

		//helper functions
		function getAttr(s, n) {
			n = new RegExp(n + '=\"([^\"]+)\"', 'g').exec(s);
			return n ?  window.decodeURIComponent(n[1]) : '';
		};

		function html( cls, data ,con) {
			var placeholder = url + '/img/' + getAttr(data,'type') + '.jpg';
			data = window.encodeURIComponent( data );
			content = window.encodeURIComponent( con );

			return '<img src="' + placeholder + '" class="mceItem ' + cls + '" ' + 'data-sh-attr="' + data + '" data-sh-content="'+ con+'" data-mce-resize="false" data-mce-placeholder="1" />';
		}

		function replaceShortcodes( content ) {
			//match [bs3_panel(attr)](con)[/bs3_panel]
			return content.replace( /\[bs3_panel([^\]]*)\]([^\]]*)\[\/bs3_panel\]/g, function( all,attr,con) {
				return html( 'wp-bs3_panel', attr , con);
			});
		}

		function restoreShortcodes( content ) {
			//match any image tag with our class and replace it with the shortcode's content and attributes
			return content.replace( /(?:<p(?: [^>]+)?>)*(<img [^>]+>)(?:<\/p>)*/g, function( match, image ) {
				var data = getAttr( image, 'data-sh-attr' );
				var con = getAttr( image, 'data-sh-content' );

				if ( data ) {
					return '

[' + sh_tag + data + ']' + con + '[/'+sh_tag+']

';
				}
				return match;
			});
		}

		//add popup
		editor.addCommand('bs3_panel_popup', function(ui, v) {
			//setup defaults
			var header = '';
			if (v.header)
				header = v.header;
			var footer = '';
			if (v.footer)
				footer = v.footer;
			var type = 'default';
			if (v.type)
				type = v.type;
			var content = '';
			if (v.content)
				content = v.content;
			//open the popup
			editor.windowManager.open( {
				title: 'Bootstrap Panel Shortcode',
				body: [
					{//add header input
						type: 'textbox',
						name: 'header',
						label: 'Panel Header',
						value: header,
						tooltip: 'Leave blank for none'
					},
					{//add footer input
						type: 'textbox',
						name: 'footer',
						label: 'Panel Footer',
						value: footer,
						tooltip: 'Leave blank for none'
					},
					{//add type select
						type: 'listbox',
						name: 'type',
						label: 'Panel Type',
						value: type,
						'values': [
							{text: 'Default', value: 'default'},
							{text: 'Info', value: 'info'},
							{text: 'Primary', value: 'primary'},
							{text: 'Success', value: 'success'},
							{text: 'Warning', value: 'warning'},
							{text: 'Danger', value: 'danger'}
						],
						tooltip: 'Select the type of panel you want'
					},
					{//add content textarea
						type: 'textbox',
						name: 'content',
						label: 'Panel Content',
						value: content,
						multiline: true,
						minWidth: 300,
						minHeight: 100
					}
				],
				onsubmit: function( e ) { //when the ok button is clicked
					//start the shortcode tag
					var shortcode_str = '[' + sh_tag + ' type="'+e.data.type+'"';

					//check for header
					if (typeof e.data.header != 'undefined' && e.data.header.length)
						shortcode_str += ' header="' + e.data.header + '"';
					//check for footer
					if (typeof e.data.footer != 'undefined' && e.data.footer.length)
						shortcode_str += ' footer="' + e.data.footer + '"';

					//add panel content
					shortcode_str += ']' + e.data.content + '[/' + sh_tag + ']';

					//insert shortcode to tinymce
					editor.insertContent( shortcode_str);
				}
			});
		});

		//add button
		editor.addButton('bs3_panel', {
			icon: 'bs3_panel',
			tooltip: 'BootStrap Panel',
			onclick: function() {
				editor.execCommand('bs3_panel_popup','',{
					header : '',
					footer : '',
					type   : 'default',
					content: ''
				});
			}
		});

		//replace from shortcode to an image placeholder
		editor.on('BeforeSetcontent', function(event){
			event.content = replaceShortcodes( event.content );
		});

		//replace from image placeholder to shortcode
		editor.on('GetContent', function(event){
			event.content = restoreShortcodes(event.content);
		});

		//open popup on placeholder double click
		editor.on('DblClick',function(e) {
			var cls  = e.target.className.indexOf('wp-bs3_panel');
			if ( e.target.nodeName == 'IMG' && e.target.className.indexOf('wp-bs3_panel') > -1 ) {
				var title = e.target.attributes['data-sh-attr'].value;
				title = window.decodeURIComponent(title);
				console.log(title);
				var content = e.target.attributes['data-sh-content'].value;
				editor.execCommand('bs3_panel_popup','',{
					header : getAttr(title,'header'),
					footer : getAttr(title,'footer'),
					type   : getAttr(title,'type'),
					content: content
				});
			}
		});
	});
})();
The placeholder images can be downloaded from here, or you could
download the whole plugin from GitHub
There you have it: a shortcode in the ultimate level.
Now, how many of you would like to see a generator for a TinyMCE button like this?..

41 Comments:
Ahmad Awais
Ohad another great contribution from your side.
Ohad Raz
Glad you like it.
Isaak Sabr Abdullaiev
You are very cool Ohad
itamar
very good Article Ohad
Alexandre Clément
Awesome post! Really helpful, taking into account the lack of documentation and cryptic nature of what does exist…
Managed to get it all working, even with an ajax call, but kinda stuck on this:
– after double clicking the placeholder, the winodw with the shortcodes’ details opens up and populates perfectly, but on submission it doesn’t post the shortcode.
Since you don’t address that, I did some digging and I’m guessing I’d have to set the editor’s cursor position manually with “ed.selection.setCursorLocation”.
But that would simply insert a new one… I’m wondering if there is a way to directly replace it, or if the best way would be to completely remove the original and insert a new one?
Once again thank you for this post, helped me save at least 2 weeks of digging around 😀
Ohad Raz
I did not address it because as you can see it works just fine since I’m replacing it on submission, I would need to see your code to understand better.
Alexandre Clément
Thanks a lot for the prompt reply 😀
I’m doing an ajax call of an external file (window.php) using a WP ajax call instead of building the popup using the “body” attribute:
add_action(‘wp_ajax_my_tinymce’, ‘my_ajax_tinymce’);
function my_ajax_tinymce() {
require_once(‘window.php’);
die();
}
This command invokes the call:
ed.windowManager.open({
file : ajaxurl + ‘?action=my_ajax_tinymce’ + extraArguments,
width : 500 + ed.getLang(‘example.delta_width’, 0),
height : 500 + ed.getLang(‘example.delta_height’, 0),
inline : 1
}, {
plugin_url : url,
});
And in “window.php”, after processing the form values, submiting to the editor with:
tinyMCEPopup.editor.execCommand(‘mceInsertContent’, false, shortcodeContent) ;
tinyMCEPopup.editor.execCommand(‘mceRepaint’);
tinyMCEPopup.close();
Alexandre Clément
Ok, so I managed to discover why it wasn’t working just as you do it… In your code you use an img placeholder, I was generating a div placeholder, thinking it would work just the same.
Apparently the “substitute” shortcode just got inserted INTO the div (weirdly enough), but if I do it with an image just like you did, all works perfectly. My bad :\
Just for the sake of learning, do you have any idea how one would modify this code to make it work with a div instead of an image?
Ohad Raz
Well you would have to play around with the regex matching the
imgtag to match yourdivtag instead.Alexandre Clément
I did manage for the replacement between placeholder and shortcode to work when changing from visual to html editor, just got that weird insertion when I re-submited the form.
I’ll tinker around, and if I do find a solution I’ll post it here, maybe it will end up helping someone else =)
Thanks a lot, very helpful!
Rami Yushuvaev
Ohad,
how can i close the “editor.windowManager.open” by pressing the ESC button?
Ohad Raz
Its kind of tricky but you can use jQuery to catch the ESC key when the popup is open.
So when you open the windowManager call this:
	$(document).on('keyup.unique_name',function(e){
		if (e.keyCode == 27) { //27 means esc key
			top.tinymce.activeEditor.windowManager.close();
		}
	});
Just make sure you unbid it on the close event, something like this:
editor.windowManager.onClose.add(function() { $(document).unbind('keyup.unique_name'); });Benno
Very nice tutorial!
It works great.., till I tried to modify it for my own needs. Maybe I’m going to extreme, but I would like a placeholder image showing up with the content…
The wordpress plugin I’m writing is to include svg images, including drag and zoom capabilities, This al works fine.
The shortcode is like this [do-svg (several parameters) ]caption for the svg imagen[/do-svg]
With this tutorial it creats this placeholder:
caption text
The problem comes converting this back to the shortcode when I go from the visual to the text editor. I can’t get it to work. I’ve been working for hours but I can’t seem to find out what the correct regex is to match this in restoreShortcodes().
Can you please help me??
btw, I have already put a link to this page in the ‘thanks to’ part of my plugin 😉
Ohad Raz
Its probably an issue with your regex.
adesiyan segun
What is this shortcode all about
? Do you mean,shortcodes like 5544 used for voting in America idol? Eg. Text yes to 5544. Please,can someone help me?thanks
Ohad Raz
Nope you are way of, read http://codex.wordpress.org/Shortcode_API to better understand what shortcodes in the WordPress world are.
Colir
Hi.First all, thnaks a lot for this ressource.
I ‘ve a question : i’m trying to setup the html render by usins an ajax request
So i change
ed.on(‘BeforeSetcontent’, function(event){
event.content = replaceShortcodes(event.content);
});
ed.on(‘BeforeSetcontent’, function(event){
myAjaxFct(event.content);
});
this work great on initialisation,
but when i’m switching from viusal editor, to text or when i validate new apram in my modal, i’v this an error :
TypeError: a is null
/wp-admin/load-scripts.php?c=1&load%5B%5D=underscore,shortcode,utils,jquery-core,jquery-migrate,backbone,wp-util,wp-backbone,media-models,plupload,json2,wp-plupload,jquer&load%5B%5D=y-ui-core,jquery-ui-widget,jquery-ui-mouse,jquery-ui-sortable,mediaelement,wp-mediaelement,media-views,thickbox,media-upload&ver=4.1.1
It’s like the event “BeforeSetContent” have synchronisation problem witn an ajax call…
Perhaps you can help me…thanks a lot
Nathan
Thanks! I’m hoping to build this into my plugin. Is it possible, however, to change the select menu so that the values it pulls in are from a post type? I want to use a CPT for this, but as an example, could you get it to pull in a list of pages that I have? The idea is that the shortcode will refer to that post ID and a piece of post meta that is there.
Toan Le Van
Wow thank U so much… this article is great. I need it …
bilal
Hi,
can anyone let me know how to create checkbox dynamically means create multiple checkbox field ?. Hope fully you guys help me. below is code
editor.windowManager.open({ // Modal settings
title: ‘Property Listing For Multiple Selection’,
width: jQuery( window ).width() * 0.2,
height: (jQuery( window ).height() – 36 – 50) * 0.7,
close_previous : “no”,
popup_css : false, // Disable TinyMCE’s default popup CS
body: [
{
type: ‘checkbox’,
name: dynamicname,
text:dynamictext,
value: dynamicvalue,
},
],
}); //window manager close
Thank
Capital Themes
Hi
I was trying to implement the same behaviour inside an inline editor created via tinyMCE (not using the wordpress shipped version).
Now, I am not using a popup window, I am trying to paste a video link and on pressing enter it would replace it with a placeholder image of the video (which I can grab via youtube’s oembed service)
Anyhow, your sample of code works only when I press Command Z on my keyboards, and it’s only then that it replaces my code with something else.
Here is a simple example of the code that I use to test the event:
editor.on(‘BeforeSetContent’, function(e){
e.content = e.content.replace(/a/g, ‘b’);
});
I am using vanilla JS by the way.
Any ideas how I can achieve that? Paste a video link, press enter and replace it with a placeholder right in an inline tinyMCE editor?
Ohad Raz
You should look at replacing your URL with an image placeholder on keyperss event something like this:
ed.on('keydown', function(e) {
     if( e.keyCode == 13 ){
          e.content = e.content.replace(/a/g, ‘b’);
          e.preventDefault();
     }
});
But I would use something other then “Enter” key because TinyMCE uses “Enter” by default for line breaks or p tags.
Capital Themes
Thanks Ohad, I have already done that, and you are right about using enter key, it does cause some unwanted empty paragraph tags which should be taken care of, but since the end user expects the enter key to do an action, I am willing to accomplish it via that key.
Now I have another problem, the onGetContent event does not fire at all, is it something related to wrapping the tinyMCE editor in a form? Any thoughts on that?
lionhurt
Very good article and very helpful, but what about nested shortcodes we use this alot
Ohad Raz
Same for nested shortcodes? or what do you mean?
lionhurt
i mean if the shortcode is container to other shortcodes like tabs, accordions or animation
lionhurt
i mean if the shortcode is container to other shortcodes like tabs, accordions or animation
gbell12
Hi Ohad – can you give some insight into your process? How did you figure all that out? I find great value in searching source code (e.g. for “do_action”), sometimes even before looking at developer docs. How about you? TinyMCE in particular has done my head in before…
Are you sources docs, then source, then other peoples’ articles?
gbell12
Sorry: “are your favorite sources docs, then source code, then other peoples’ articles?”
victor
Hi Ohad. Great tutorial! Thank you so much.
Would it be possible to replace the shortcode with an styled div instead of an img? Could you update the code to achieve that, please?
I’ve tried, but I’m not able to achieve the desired behaviour.
Thanks!!
Ohad Raz
should be possible.
Andrew Klossner
Hello
I am trying to add three different shortcode generators. The problem is that this keeps replacing all of the shortcode placeholder images with the shortcode generator that is first in the javascript.
How can I get it to keep all of them separate.
Ohad Raz
You should keep your regex and placeholder with unique identifier per each shortcode or replacement you want, otherwise, yes it will replace all images.
jasondavisfl
SImilar to the previous comment…I took this plugin and installed it. I then cloned it and edited everything simply changing all names for a new shortcode. MY issue is that in the new plugin when I generate a shortcode using the popup window it creates the shortcode from this post [bs3_panel] instead of my new plugins shortcode name. It seems somehow perhaps the Javascript variable holding the name is overriding the one in my plugin maybe? I tried changing several of the variable names and function names as well but the same issue still exist. If I disable your plugin then mine starts using its own correct shortcode name
jasondavisfl
I think I found the problem… the function restoreShortcodes() which searches the post content for images. If more than 1 plugin like this above are ran, then this function is triggered from each plugin and they all match on the same images! A solution might be to change the RegEx above to make it look for a class name on the image matching the one added from the plugin. Then each plugin which wouyld add a different class name when building the image so then this function would only replace the image content on the images which actually belong to that pklugin!
Ohad Raz
that is correct.
Sajib Talukder
HI, can you help me to get ride of this issue.(with example) please
Thanks in advance.
Rehan
Wow.. Greate one mate, just a simple question. how do i add file upload field to this? maybe not from wp media, but from our computer. can you help me on this please.
Marc
Absolutely adds value to shortcodes. I got it up and running without any issues. I used http://regexr.com/ to adjust the existing regex to my needs. It saved me a massive amount of time going through the tinyMCE documentation and figuring out regexes myself. Thank you for sharing & good documentation.
Shaun Cockerill
This is very detailed, thank you so much for this.
Just a couple of notes…
I decided to use a disabled input element as my viewable/clickable item, but I ran into issues when inserting the updated content, as it seems the default editor.insertContent() lost the selection when those types of elements were clicked.
To get around it, in editor.on(‘DblClick’,function(e){}) when opening the popup I added e.target as the ui variable, instead of an empty string, then if ui was supplied during the popup onsubmit, I replaced it with the html: editor.$(ui).replaceWith( html( shortcode_class, shortcode_attr, e.data.content ) );
None of my attributes were required, which meant that sometimes they were not defined. This caused issues during restoreShortcodes, so I changed it from checking data, and verified that it had the correct classes instead.
Roee Yossef
Thanks for the info,
i was at the point were i looked how to render the shortcode on the backend and your article helped 🙂