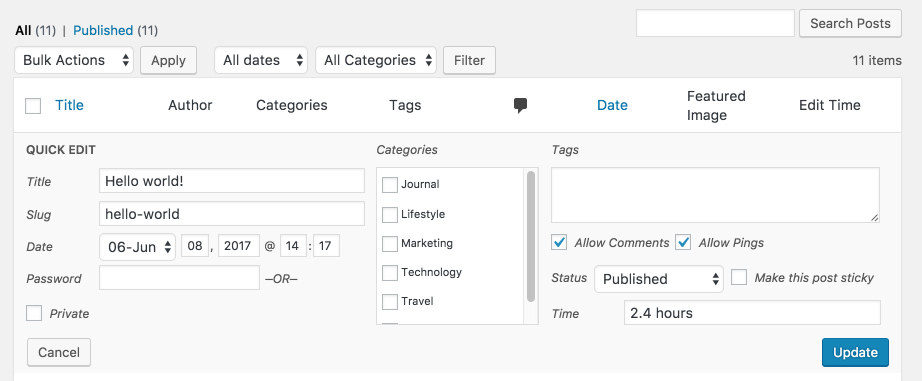
In this tutorial I’m going to show you how to make your very own Quick Edit fields to improve your client’s content editing experience.
Quick Edit Fields
You probably heard this phrase many times: “Content is king”. By all means, that’s true. No matter how awesome your site is functionality-wise, if it isn’t easy for the content editors to manage, then your site will simply suck. And we don’t want our sites to suck, do we?
One of the most useful features, especially in terms of User Experience, since WordPress 2.7 history is the Quick Edit panel. Quick Edit allows you to edit different pieces of data about a post without having to navigate your browser to the full edit page. The amount of time it helps save when editing main details of a post is a big deal. As a personal favorite feature, and generally as a popular feature of WordPress, I am going to dive into how to set up your very own Quick Edit fields. This way, your clients will have more control over their content when editing their content.
Note: Before you can create a Quick Edit field, you must register a custom admin column. Unfortunately, there is currently no way to add a Quick Edit field without a custom column.
Step 1: Creating a Custom Column
For simplicity’s sake, the column we’ll add here will be for the amount of hours taken for a post to be written.
This code will create a new column under the “Post” post type. For now, it’ll be empty, until we set its display logic. If you’d like to register a column for a different Post Type, then use this filter instead:
add_filter( "manage_{$post_type}_posts_columns", 'generatewp_quickedit_custom_posts_columns' );
Where $post_type is the slug/key of your post type.
Step 2: Display Logic for our new Custom Column
Now that we have our brand new column added, let’s make it show something meaningful. The action which we are going to use to display the contents of this Custom Column is: manage_{$post->post_type}_posts_custom_column (where $post_type is our preferred Post Type slug). According to the official WordPress documentation this action fires for each custom column of a specific post type in the Posts list table.
Upgrade to GenerateWP Premium Enjoy better WordPress generators Upgrade Now
That means that for every single column that WordPress has registered itself (native ones), and, ones added by plugin will be processed one by one using this filter. This gives us a chance to set our display logic and define what we’d like to display under our new column.
Here’s our code which will display whatever is set in our custom field. If nothing has been set for that field, then “N/A” will be shown instead. Note lines 6-10.
Finally, we can have real data displayed. You should be seeing a result similar to this one, only that we might only see “N/A” all over. This is because we haven’t entered any data yet. But we’ll do it soon.

Step 3: Add a Quick Edit controller field
Next step is to add the field to the Quick Edit box. This is done via the quick_edit_custom_box action, which fires our callback function with 2 parameters: the $column_name and current $post_type.
Once the code is saved, you should be seeing something like this:

Step 4: Handle saving of the Quick Edit field data
Once the user has entered data into the custom Quick Edit field, we must handle the saving of this data. WordPress won’t do it for us and so otherwise the data will be lost.
We’ll define a function that captures the data entered into our field and that saves it into the post’s metadata.
Step 5: Populate our field with live data with JavaScript
Right now, we got the field showing up and the handling of its saving process.
Next is to make sure the data is being displayed when users click on “Quick Edit” in the dashboard. As of now, if you click that link, nothing will show in our field.
Upgrade to GenerateWP Premium Enjoy better WordPress generators Upgrade Now
The reason is that WordPress still isn’t supporting an easier way to do so. Our only way for now is to use JavaScript. It’s not so bad, just follow the code here.
This code activates a JavaScript event which will run every time a user clicks on “Quick Edit”. Once that happens, the value of our custom field will be inserted into the text input (field) so the user can see and edit it.
You may ask yourself, where the data is coming from? Well, we need to specify that as well.
Here, we are altering the “Quick Edit” button (for every post) by adding it a new attribute, data-edit-time, which includes the data previously saved by the users.
Then, the function above will take the value found here and insert it directly into the field, when the Quick Edit box is being opened.
At this stage the Quick Edit field is ready to go. Give it a try!


8 Comments:
Collins Agbonghama
Awesome. Exactly what I was looking for.
Smbat Aghekyan
Thanks!
Fernando Alencar
what is the final code to put in wordpress? And where do I put it? no functions
Fernando Alencar
Where do I put the codes? no functions?
Dev
How to do this in custom post type?
Ben DeMoras
How would I do this with multiple custom fields?
Yuri Sturkenboom
This has been incredibly helpful, thank you very much for taking the time to write this out!
Tarun
How do you got the $post_id variable value in generatewp_quickedit_fields() function ?